Rust Embedded: Setup - Part 1
If you have followed Part 0 of the setup, you are ready to build and flash your first program to the board. For now it is not about the code itself, but how to get it running on the microcontroller. The setup for a very simple program that will light up an on-board LED looks as follows.
This post was written with the help of ChatGPT. By that I mean, that I let proof read ChatGPT parts of the text, and, in case, used optimizations that ChatGPT offered.
Code structure
First create a new folder, eg. basic-led-on, and then setup the subfolders and files like the following:
\-- basic-led-on
    \-- .cargo
        +-- config.toml
    \-- .vscode
        +-- settings.json
    \-- src
        +-- main.rs
    +-- Cargo.toml
    +-- memory.x
    +-- openocd.gdb
Let’s go over each file and discuss it in more detail.
.cargo/config.toml
[target.thumbv7em-none-eabihf]
runner = "arm-none-eabi-gdb -q -x openocd.gdb"
rustflags = ["-C", "link-arg=-Tlink.x"]

[build]
target = "thumbv7em-none-eabihf"
The config.toml file tells Cargo how to build for our microcontroller’s architecture (cross-compiling) and how to run the compiled program. In Part 0 we installed the thumbv7em-none-eabihf target triple, which matches our board. The [build] section sets this as the default target, so Cargo will always compile for it. Under [target.thumbv7em-none-eabihf], we configure two things:
runner: the command Cargo runs when you docargo run. Here it launchesarm-none-eabi-gdbwith a script that flashes the program to the board.arm-none-eabi-gdbwas installed with the ARM GNU Toolchain from part 0.rustflags: extra options for the compiler, in this case telling the linker to use our link.x script to place code and data correctly in memory.
The link.x file is usually provided by the embedded support crate you’re using - in our case by the cortex-m-rt crate.
Here’s how it works:
- The cortex-m-rt crate ships with a linker script template.
- When you build your project, Cargo automatically copies that template into your build directory and renames it link.x.
- The script describes how the compiled program should be laid out in memory: where to put
.text(your code),.data(initialized variables),.bss(zeroed variables), stack, and interrupt vectors. - The cortex-m-rt crate expects the user to provide a memory.x file with the memory layout for your microcontroller. cortex-m-rt’s link.x will then include it.
.vscode/settings.json
{
  "rust-analyzer.check.allTargets": false,
  "rust-analyzer.cargo.target": "thumbv7em-none-eabihf"
}
You probably want to install rust-analyzer if you are using VSCode and add this settings.json file. Here’s what those lines do:
-
"rust-analyzer.check.allTargets": false: Prevents rust-analyzer from trying to check every possible target in your Cargo project (which would include desktop builds). This avoids false errors since standard libraries for embedded targets are different ans our target does not havestdsupport. -
"rust-analyzer.cargo.target": "thumbv7em-none-eabihf": Ensures rust-analyzer runscargo checkand related tasks using your Cortex-M target triple, so IntelliSense matches what you’ll actually build/flash.
src/main.rs
#![no_main]
#![no_std]

extern crate panic_halt;

use cortex_m_rt::entry;
use cortex_m_semihosting::{self, hprintln};
use stm32f3::stm32f303;

#[entry]
fn main() -> ! {
    // You should see that in your openocd output
    hprintln!("Hello from Discovery");

    let peripherals = &stm32f303::Peripherals::take().unwrap();

    let rcc = &peripherals.RCC;
    rcc.ahbenr.write(|w| w.iopeen().enabled());

    let gpioe = &peripherals.GPIOE;
    gpioe.moder.write(|w| w.moder9().output());
    gpioe.odr.write(|w| w.odr9().set_bit());

    loop {}
}
The actual program. Shortly, it takes the peripherals, enables GPIO Port E, sets the pin 9 of port E as output and sets the pin to high so that the LED (User LED3 as documented in the User Manual of the discovery board), which is attached to this pin, lights up.
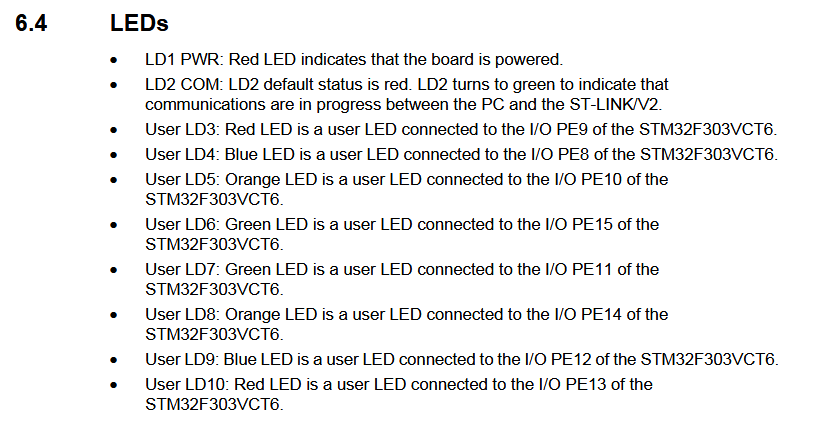 STM32F3 Discovery Board User Manual p. 19
Cargo.toml
[package]
name = "basic-led-on"
version = "0.1.0"
edition = "2024"

[dependencies]
stm32f3 = { version = "0.15.1", features = ["stm32f303"] }
cortex-m = "0.7.0"
cortex-m-rt = "0.7.3"
cortex-m-semihosting = "0.5.0"
panic-halt = "0.2.0"
Nothing special here. In the Cargo.toml file we define the dependencies we need. See more keys and their definitions at doc.rust-lang.org.
memory.x
MEMORY
{
  FLASH : ORIGIN = 0x08000000, LENGTH = 256K
  RAM : ORIGIN = 0x20000000, LENGTH = 40K
  CCRAM : ORIGIN = 0x10000000, LENGTH = 8K
}
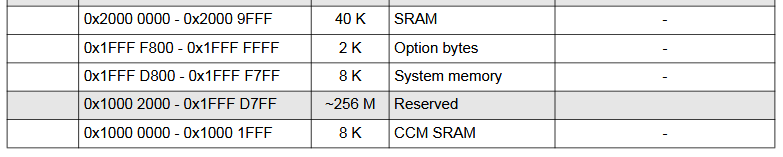
As already mentioned under the .cargo/cargo.toml file, we need to provide a memory.x file for the linker. Here we define the exact memory layout for our microcontroller. But where can we find those addresses and sizes? For that we have to look at the Reference Manual. For the RAM we can find the address and length under 3.2.2 Memory map and register boundary addresses on page 56. Same for the CCRAM. There is documented that the RAM (SRAM) starts at 0x20000000 and is 40 K in size. CCRAM (CCS SRAM) starts at 0x10000000 and is 8 K in size. On the next page, 57, we can find the start address for the main flash memory, FLASH, which starts at 0x08000000 and is 256 K in size.
 STM32F3 Reference Manual p. 56
openocd.gdb
Mostly taken from here https://docs.rust-embedded.org/discovery/f3discovery/05-led-roulette/the-challenge.html
target extended-remote :3333

# print demangled symbols
set print asm-demangle on

# set backtrace limit to not have infinite backtrace loops
set backtrace limit 32

# detect unhandled exceptions, hard faults and panics
break DefaultHandler
break HardFault
break rust_begin_unwind

# *try* to stop at the user entry point (it might be gone due to inlining)
break main

# enable semihosting to see output from hprintln!("...")
monitor arm semihosting enable

# flash the program into the microcontroller
load

# start the process but immediately halt the processor
stepi
The openocd.gdb file contains some statements for the gdb server so that we don’t have to type them everytime we run cargo run. First we need to connect to the the running OpenOCD’s GDB server which listens on port 3333 (see output in Part 0). Flashing the program into the microcontroller is actually done by the load command. This file is used by the runner in the .cargo/config.toml file.
You should now have a base project setup ready to be tried out on your discovery board. This would be your next steps:
- Connect your board via USB to your PC
- Open a terminal and start OpenOCD with
openocd -f board/stm32f3discovery.cfg - Open another terminal, cd into this project
cd /path/to/basic_led_onand runcargo run- this opens a gdb session - The red LED on you board should not light up
- In the gdb session type
continueand hit Enter - you should be halted at the main breakpoint - Again, type
continueand hit Enter - the LED should now light up - Ctrl+C for exiting and then
quit+ Enter (in the OpenOCD terminal also, Ctrl+C)
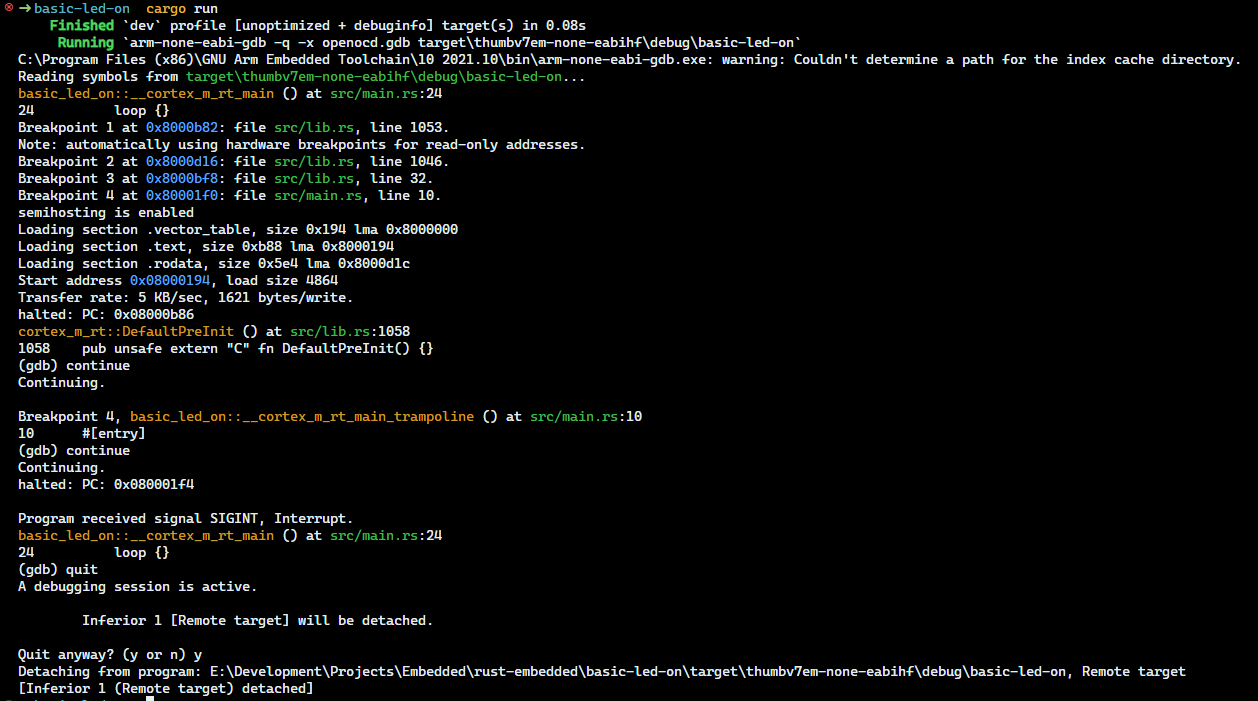
In my terminal the output looks like that:
For a more in-depth guide on how to debug and use GDB check out the Rust Embedded Discovery Book